
Trust me, I have been to companies that have been frustrated , and in some cases angry. I am happy to report that each and every time I leave, the people are far less frustrated (and in many cases.. excited) because they had no idea that HireTrack was as powerful or as simple as they thought. People have a tendency to overthink it. Don't know why, but they do. So, GET SOME TRAINING!!
Anyway, one thing that I have found very helpful in this process is for me to place the company logo on the HireTrack desktop. I think it gives the user more "ownership" and "pride" to see their company logo instead of the Eclipse logo. I get it. In almost all cases, that one little thing can mean the difference between cynicism and optimism. So, here is what you do.
Take your company logo and size it in a graphics program. I would suggest a size of about 400 pixels (depending on your resolution). Don't make it too big because it starts to overtake the screen. I would also offer that you change the background color too. This just makes your logo appear as if it supposed to be there instead of this large white box in the center of your screen. The HireTrack background blue colors are R-220, B-248 and G-226. Once you have created it as you wish, save it as a BITMAP and name it logo.bmp. Now, copy that bitmap file it into the same folder as your Eclipse program (typically C:\Program Files\Navigator Systems\Eclipse). When you restart HireTrack, your logo will appear on the HireTrack desktop.
Believe me, it's a pretty cool thing for the users when they see that.
Monday, January 26, 2009
Understanding Aliases (and Reminders?)
Aliases are quite different from Composites in that aliases really are nothing more than a list of equipment that is automatically added to an equipment list. If I were to use a computer term, an alias is a bit like a macro in that if you select an alias type, HireTrack performs a function.. it adds all the defined types to an equipment list.
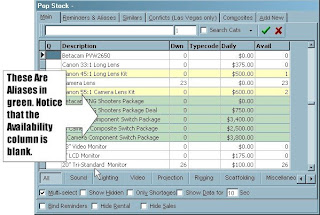
Now aliases are indicated on a popstock window with pale green background and the availability column is blank since aliases don't calculate the availability of the whole package like a composite.
Should you wish to see what equipment is part of that alias, you can select on the Reminders & Aliases tab. The information for both aliases and reminders appear on the same tab, because realistically... An alias is nothing more than a reminder with all the components selected. So, when you select an alias type in green, HireTrack is adding all the types in the alias to your equipment list, including composites (but you cannot have an alias in an alias. Or an alias in a composite for that matter!).
However, just to add to the confusion, aliases come in two flavors... A standard alias and a priced alias. Standard aliases just add all the equipment to the equipment list and price the equipment line by line. Click here to see an example of a standard alias. A priced alias, however, will add all the kit line by line, but it adds 1 line to the order, which holds the total price for the package, while the equipment lines are given a 100% discount. Click here to see an example of a priced alias.
One of the most common uses of an alias is to convert an equipment list into an alias. Let's say Mike has an equipment list that he is constantly copying and pasting from one job to another (You do know you can do this, don't you?). Mike gets frustrated because he has to constantly go find the old job, choose edit | Select All, Choose Edit | Copy, go to the new equipment list, and choose Edit | Paste (like how I wove some instruction into this story?). So, you as the savvy HireTrack user decides to make Mike's life easier by turning Mike's equipment list into an alias.
So, go to Mike's Equipment List and choose Edit | Select All. Then choose Edit | Copy. Now, go to the Equipment Book and create a new type. Call it "Mike's awesome Video System". Now select a category for that type, and tick the checkbox labeled "Alias/Total Markup" (I will explain Total Markups later this year). Now press the POST button (the one with the ! in the icon). The reminders tab will become an alias tab (remember Aliases and Reminders are closely related). Now, click on that alias tab, and in the frame, press the PASTE button. Once the list is built, press the post button again. Now, when you go back to the popstock window, type Mike and press the space bar. Mike's awesome video system will appear in the popstock window. You can then select this and it will automatically add all the kit. I have been in companies where Mike has 10-12 aliases and Leo has 10-12 aliases, and it saves the users immeasurable amounts of time.
So, how do you build an alias?
You will also need to determine if you do not wish to charge for the type by unselecting the "Charge" column (the default is charged). Any non charged equipment will receive a 100% discount.
Press the POST button to save your alias. If you make a mistake, you can press the CANCEL button (the black X).
To delete a line a line from your alias, press the DELETE button (the one with the Red X).
Aliases are a great way to save your sales staff a lot of keystrokes and a lot of thinking about what equipment or parts may be required for an order.
Now aliases are indicated on a popstock window with pale green background and the availability column is blank since aliases don't calculate the availability of the whole package like a composite.

Should you wish to see what equipment is part of that alias, you can select on the Reminders & Aliases tab. The information for both aliases and reminders appear on the same tab, because realistically... An alias is nothing more than a reminder with all the components selected. So, when you select an alias type in green, HireTrack is adding all the types in the alias to your equipment list, including composites (but you cannot have an alias in an alias. Or an alias in a composite for that matter!).
However, just to add to the confusion, aliases come in two flavors... A standard alias and a priced alias. Standard aliases just add all the equipment to the equipment list and price the equipment line by line. Click here to see an example of a standard alias. A priced alias, however, will add all the kit line by line, but it adds 1 line to the order, which holds the total price for the package, while the equipment lines are given a 100% discount. Click here to see an example of a priced alias.
One of the most common uses of an alias is to convert an equipment list into an alias. Let's say Mike has an equipment list that he is constantly copying and pasting from one job to another (You do know you can do this, don't you?). Mike gets frustrated because he has to constantly go find the old job, choose edit | Select All, Choose Edit | Copy, go to the new equipment list, and choose Edit | Paste (like how I wove some instruction into this story?). So, you as the savvy HireTrack user decides to make Mike's life easier by turning Mike's equipment list into an alias.
So, go to Mike's Equipment List and choose Edit | Select All. Then choose Edit | Copy. Now, go to the Equipment Book and create a new type. Call it "Mike's awesome Video System". Now select a category for that type, and tick the checkbox labeled "Alias/Total Markup" (I will explain Total Markups later this year). Now press the POST button (the one with the ! in the icon). The reminders tab will become an alias tab (remember Aliases and Reminders are closely related). Now, click on that alias tab, and in the frame, press the PASTE button. Once the list is built, press the post button again. Now, when you go back to the popstock window, type Mike and press the space bar. Mike's awesome video system will appear in the popstock window. You can then select this and it will automatically add all the kit. I have been in companies where Mike has 10-12 aliases and Leo has 10-12 aliases, and it saves the users immeasurable amounts of time.
So, how do you build an alias?
- Go to the Equipment Book and create a new type of equipment by pressing the Add New Button.
- Give it a type description.
- Assign a category.
- Click the Alias/Total Markup box. The Type you are defining becomes an Alias for the Associated Types. The Reminder tab will become renamed Alias, the background of the alias will appear green (as in the popstock) and the equipment you enter on this tab will be entered on the Equipment List automatically when this Type is selected. (I usually press the POST button now).
 You will need to select the alias type. Selecting Alias Price, will create a priced alias as described above. Selecting the Item Price will create a standard alias as described above.
- Press the Add New Button to create a new line in the alias.
- Enter a quantity needed in the quantity column and select your type using the Smart Find Window.
- You will also need to determine how to calculate the ratios of the equipment in the alias. This can be a bit confusing, so you may want to experiment a little.

- In our example, if you need to round the values up so selecting 1 alias will add 2 8" Video Monitors, then select "Exact Ratio".
- However if you don't want an additional monitor unless you select 2 of the alias, then select "Markup Exact Ratio".
- If however, you wish to keep the reminder quantity a constant minimum, then select "Treat as Blocks". For Example if the quantity ration is 3 Per 6, then treating as a block would choose 3 for every quantity between 1 and 6. 6 units would be suggested for every quantity between 7 and 12, and so forth.
You will also need to determine if you do not wish to charge for the type by unselecting the "Charge" column (the default is charged). Any non charged equipment will receive a 100% discount.
Press the POST button to save your alias. If you make a mistake, you can press the CANCEL button (the black X).
To delete a line a line from your alias, press the DELETE button (the one with the Red X).
Aliases are a great way to save your sales staff a lot of keystrokes and a lot of thinking about what equipment or parts may be required for an order.
Monday, January 5, 2009
Printer Groups
One of the more overlooked features in HireTrack is Printer Groups. Printer Groups are useful when you want to add a report to HireTrack, but you only wish certain people to see that report. For instance, you may have created a financial report that you only wish managers to examine, or perhaps there is a prep sheet that the warehouse staff needs to print. Typically, everyone is in Print Group 1, but you can easily place a user in a separate group on the Users tab of the Configuration Utility. You will need to have access to the Configuration Utility in order to setup and use Printer Groups.
Now, to be candid, you should think through the impact of using printer groups and plan accordingly. I wouldn't recommend that a smaller organization have more than 2 or 3 printer groups, but provisions are made to have up to 16.
Once you have assigned a user to a printer group, you can then add reports to HireTrack, and assign them to printer group 2 (this is done in the configuration utility). Make sure you unselect "In ALL Groups" to prevent that report from appearing in any other group. Only those users that have been assigned to printer group 2 will be able to select that report. Users in other printer groups will not be able to select (or even see for that matter) that report. Typically, Printer Group 1 is used for ALL USERS, and since "In ALL Groups" is selected, that report will appear for all printer groups.
Saturday, January 3, 2009
Understanding Composites
I suspect that when you first saw a composite that your first reaction was excitement at the usefulness. However many times, when it comes to implementation, that excitement may have turned to confusion. Composites, aliases and reminders are one of HireTrack’s most powerful features, but many times people have difficulty in putting these compelling features into use. Over the next couple of weeks, I will share with you how to make the most of your equipment packaging through aliases, reminders and composites.
Put simply, Composites are virtual pieces of equipment in your inventory that are built using actual pieces of equipment. So, TYPES A, B, C are combined to a system, which is TYPE D. You can’t own a composite, you own the pieces that make the composite. The power in this system is that TYPES A and C could also be used in other composites. Practical uses of composites would be things like amp racks, mixing desks, lighting boards, video projectors, and equipment where the components make the unit whole. A good rule of thumb for composites is that if one type of equipment is missing, then the whole system won't work. For example, a computer is made up of a CPU, a monitor, a keyboard, and a mouse. You can use any keyboard, mouse or monitor with the CPU, but if one piece is not available(say the keyboard), then the whole system is unusable (or un-rentable as the case may be!).
Let me give you a simple example:
Source 4 lighting instruments (forgive me, I was an audio guy!) are made up of 2 pieces, the lamp body, and the lens. You can place a number of different types of lenses on the lamp body to make a system. So, in popstock you would see:
(Notice the yellow background, which is your cue that the type is a composite)
Now the 19 degree leko is made up of: 
and the 26 degree leko is made up of: 
Notice that the lighting instrument is used in both composites. So if I added 50 of the 19 degree lekos to an order, look at the impact on the 26 degree lekos:

Remember, when you are selecting a composite, you are really selecting the types that make up the composite, and those component pieces may be used on several different types of composites. People have a tendency to over-think composites. Keep them simple, and remember that before you build a composite, you must first make sure you have the equipment types created first. I don't typically recommend that a composite consist of more than 8 to 12 components, unless they are needed. Too many components, and your composites will usually be short because you may be missing something small.
Follow this link for a demonstration on how to build a composite.
Subscribe to:
Posts (Atom)

